In today’s fast-paced digital world, customers value the ease of booking appointments through familiar platforms like WhatsApp. Clickiny simplifies the process by offering a dedicated appointment booking form that lets businesses manage bookings seamlessly, with options for appointment lengths, availability, and more. Here’s how you can create and customize a WhatsApp appointment booking form with Clickiny.
Why Use WhatsApp for Appointment Scheduling?
Managing appointments can be a challenge for many businesses, with common issues like missed requests, slow response times, and no-shows. Traditional scheduling methods, whether by phone or online booking platforms, can be time-consuming and may not fit with clients’ busy lives. Here’s how a booking form that submits directly to WhatsApp can make scheduling easier:
- Faster Responses: Appointment requests go straight to WhatsApp, a platform most clients check frequently, reducing missed or delayed responses and improving customer satisfaction.
- Real-Time Communication: Clients receive instant confirmations and updates, fostering a more engaging booking experience that builds trust and keeps them informed.
- Simplicity: Unlike complex booking platforms, a WhatsApp form is easy to use—clients don’t need extra logins or apps. They can book in a few clicks and receive follow-ups directly in WhatsApp.
- Reduced No-Shows: Send reminders and rescheduling options directly to clients, helping to reduce missed appointments.
In short, WhatsApp-based booking forms streamline scheduling, enhance client communication, and centralize appointment management, creating a seamless experience for both businesses and their clients.
How to Set Up a WhatsApp Appointment Booking Form with Clickiny
For this example, we’ll create a WhatsApp appointment booking form for a hair salon. This customized form will allow clients to easily book services like haircuts, color treatments, and styling directly through WhatsApp. With Clickiny, setting up a booking form that suits your salon’s schedule and services is quick and simple, streamlining appointment requests to your WhatsApp inbox.
Follow these steps to design a booking form tailored to your business’s needs:
Step 1: Visit Clickiny
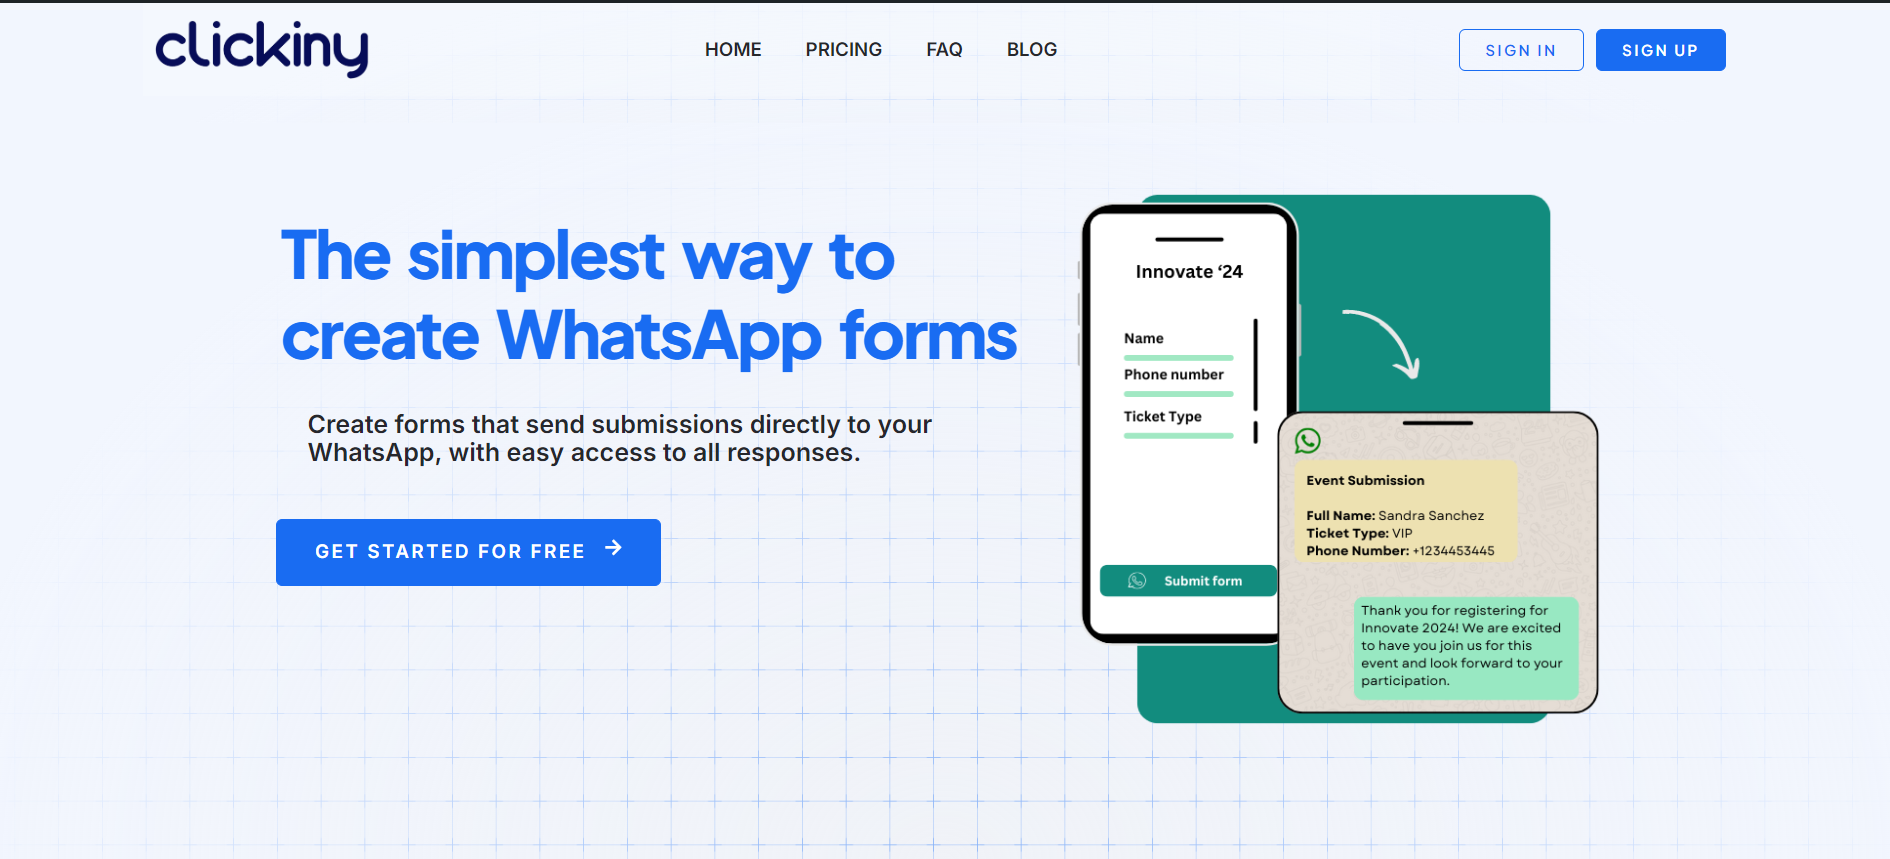
To get started, head to Clickiny.com, where you’ll have two options to access your account:
- Log In: If you already have a Clickiny account, simply log in using your credentials. This will take you directly to your dashboard, where you can start creating your booking form.
- Sign Up: If you’re new to Clickiny, click Sign Up to create an account. During the signup process, you’ll be asked for basic information about your business, such as your name, email address, and your hair salon’s WhatsApp number. Once you complete the registration, you’ll have access to Clickiny’s dashboard, where you can begin setting up your WhatsApp booking form.
Step 2: Create a New WhatsApp Form
In the Clickiny dashboard, simply click “Create WhatsApp Form” and enter your WhatsApp phone number in the pop-up. This ensures all appointment requests go directly to your WhatsApp inbox.
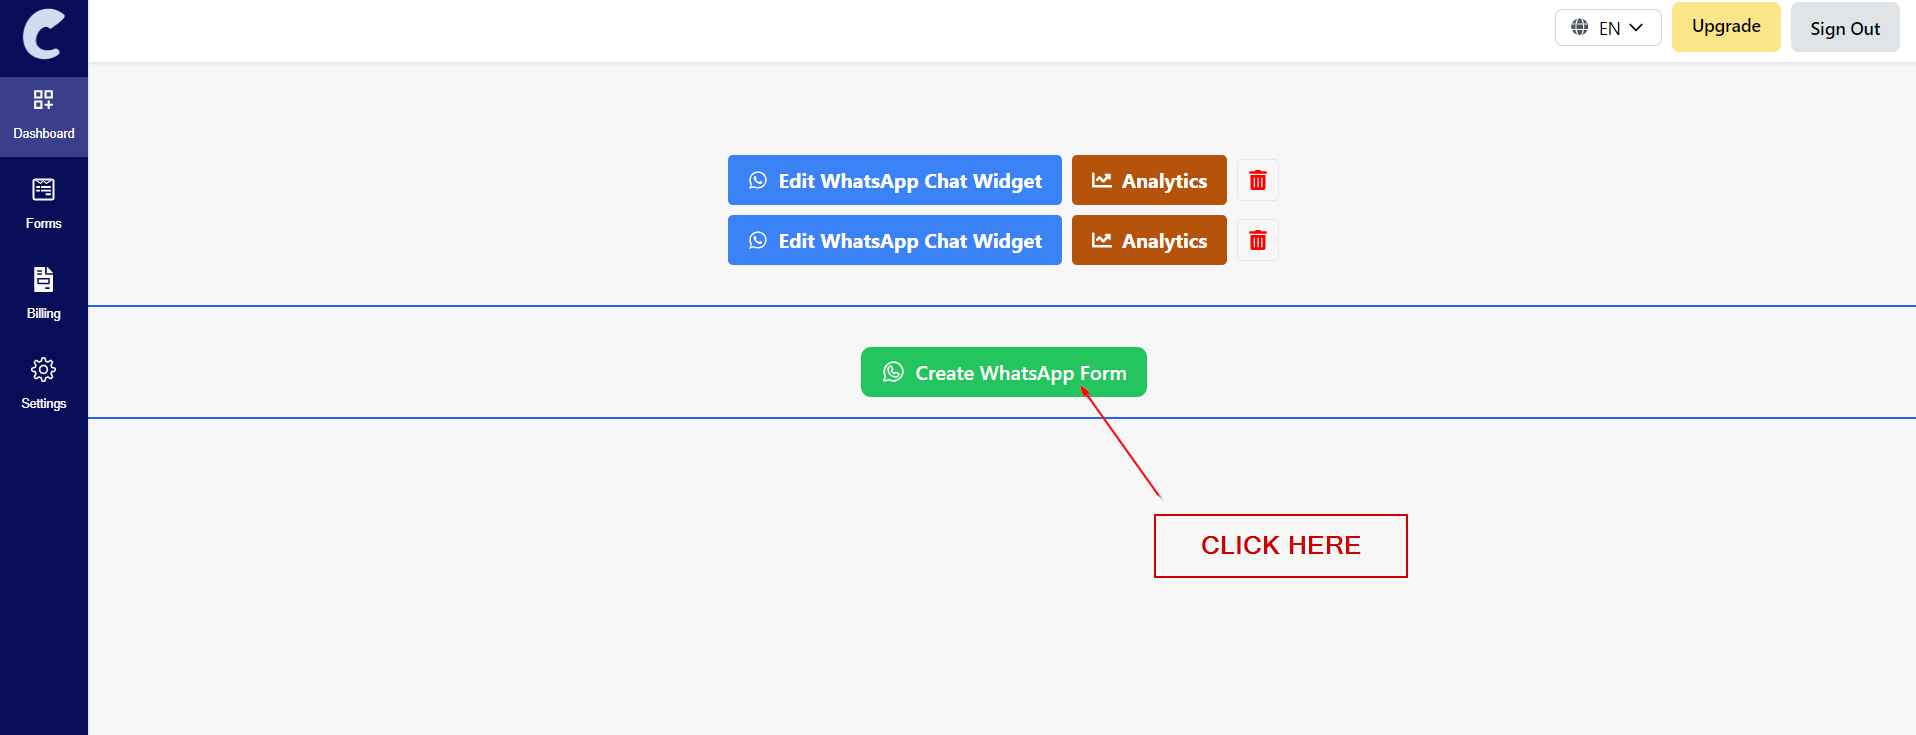
Step 3: Add the Appointment Form Element
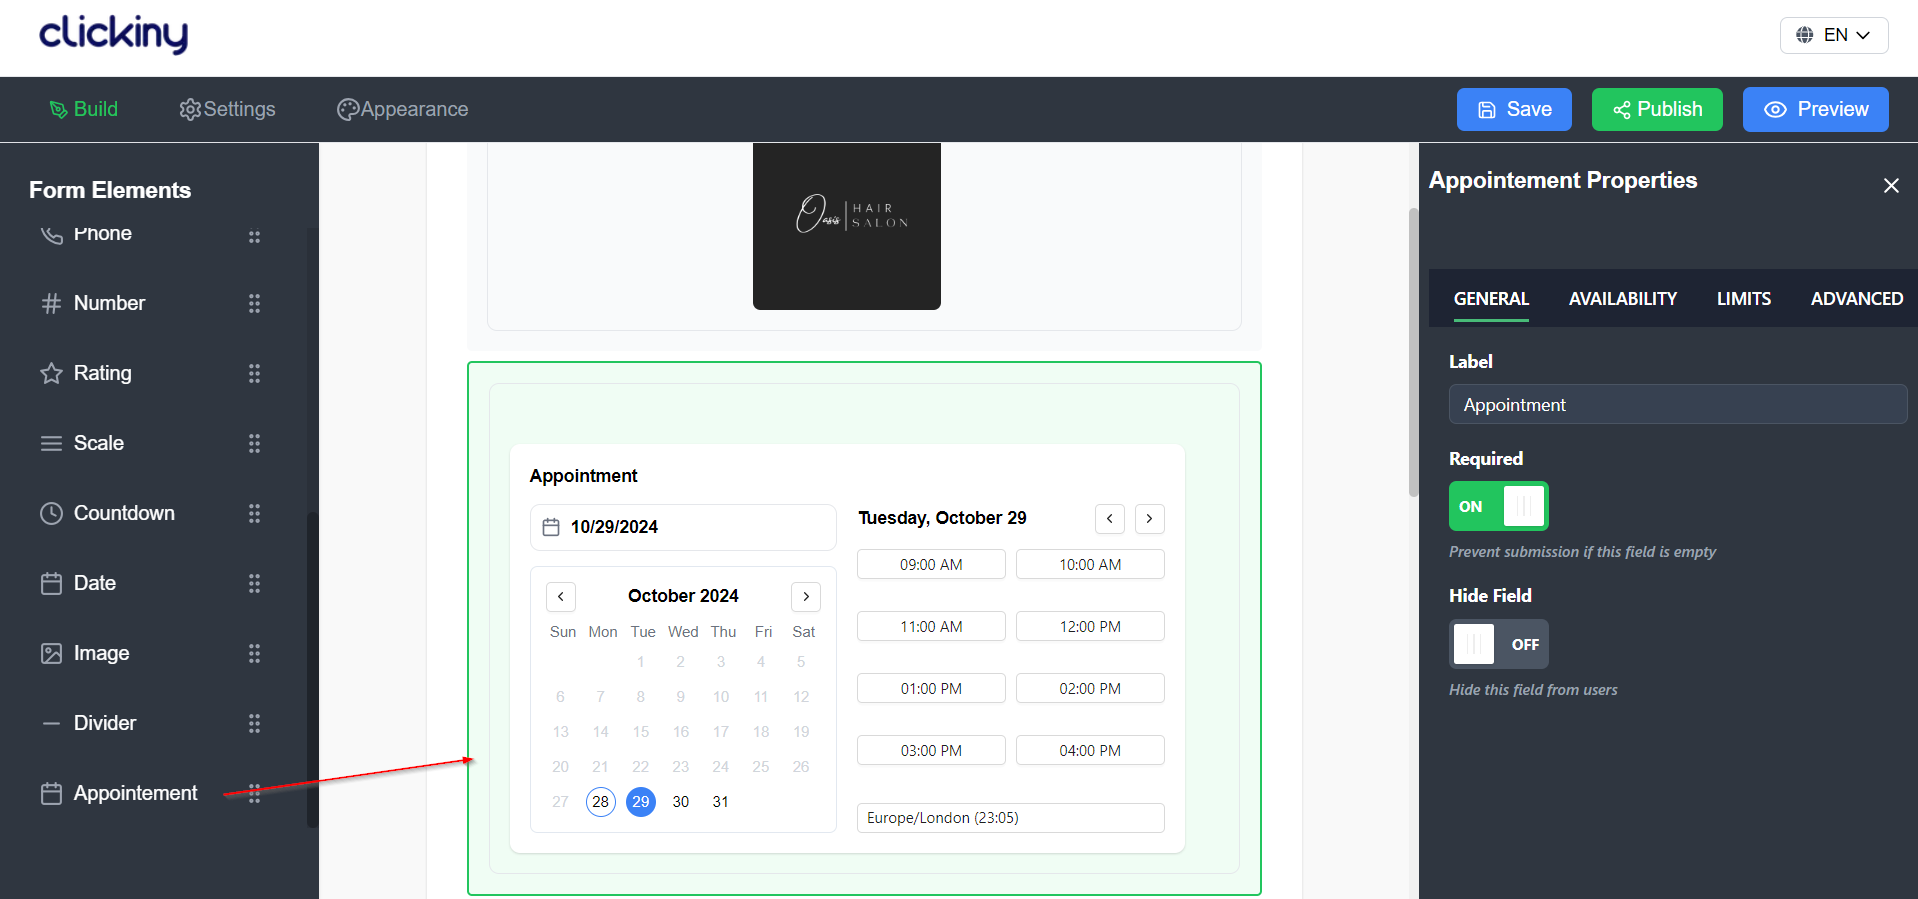
The Appointment Form element is a key feature that allows you to set specific scheduling options for your hair salon. Here’s how to add and configure this element in your booking form:
- Locate the Appointment Form Element: In the Clickiny form builder, find the Appointment Form element in the sidebar. This feature is designed specifically for managing appointments, making it ideal for your salon’s needs.
- Drag and Drop: Click on the Appointment Form element and drag it into your form workspace. This action will create a section in your form dedicated to appointment scheduling.
Step 4: Configure Appointment Settings
Once you’ve added the Appointment Form element to your booking form, it’s time to customize the settings to align with your hair salon’s scheduling needs. This step is crucial for ensuring that clients can book appointments efficiently and according to your availability. Here’s how to configure the appointment settings:
Set Appointment Duration:
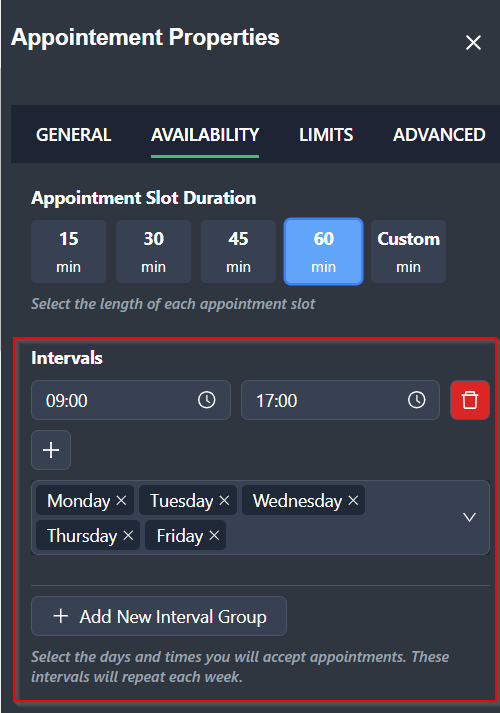
Determine how long each appointment will last. For instance, if a standard haircut takes 30 minutes, set the duration accordingly. You might also have different durations for various services, like 45 minutes for color treatments or 60 minutes for special styling sessions. This setting helps clients know how much time to allocate for their visit.
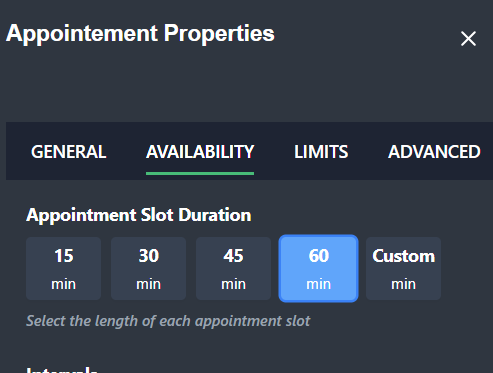
Define Available Days and Times:
Specify the days of the week that your salon is open for appointments. Select the days you want to allow bookings (e.g., Monday through Saturday) and input your available hours for each day. For example, you might be open from 9 AM to 5 PM on weekdays and have extended hours on Saturdays.
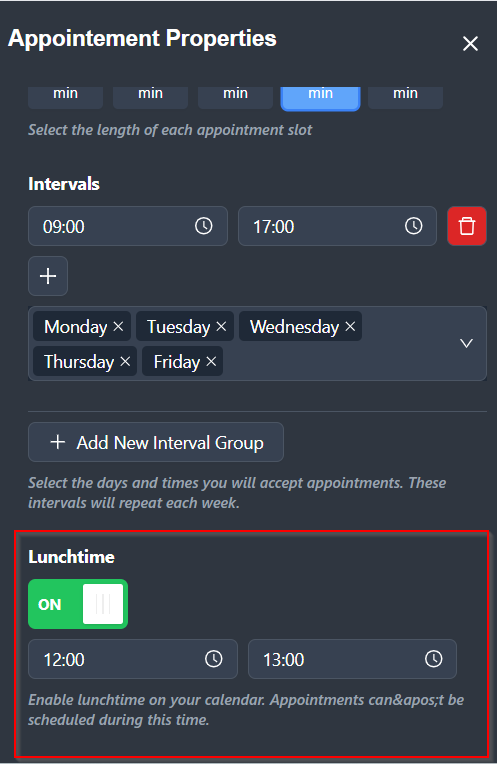
Block Off Lunchtime and Other Breaks:
To prevent clients from scheduling during your lunch break, enable a setting to block off specific times. For instance, if your salon closes from 12 PM to 1 PM for lunch, ensure that these hours are not available for booking. This helps maintain a balanced schedule for you and your staff.
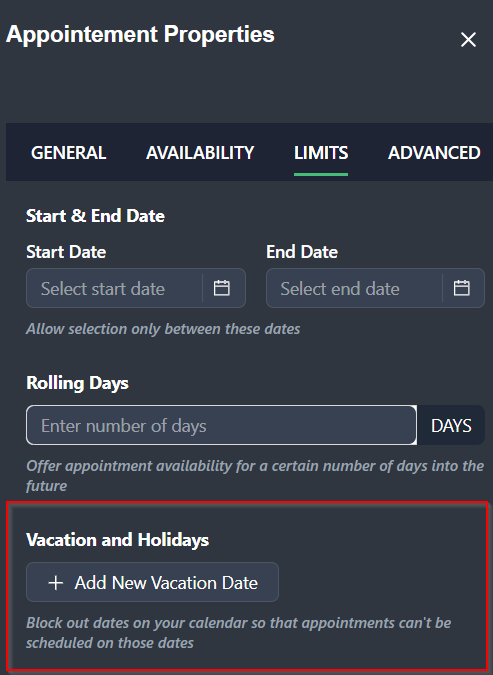
Manage Holidays and Vacations:
To avoid any confusion, set up your holiday and vacation schedule. Input any days your salon will be closed, such as public holidays or personal time off. By doing this in advance, clients won’t be able to book appointments during these times, reducing the risk of cancellations or no-shows.
By thoroughly configuring your appointment settings, you create a streamlined booking experience for clients while effectively managing your salon’s schedule. This attention to detail enhances customer satisfaction and helps maintain a well-organized appointment system.
Step 5: Add other Form Fields
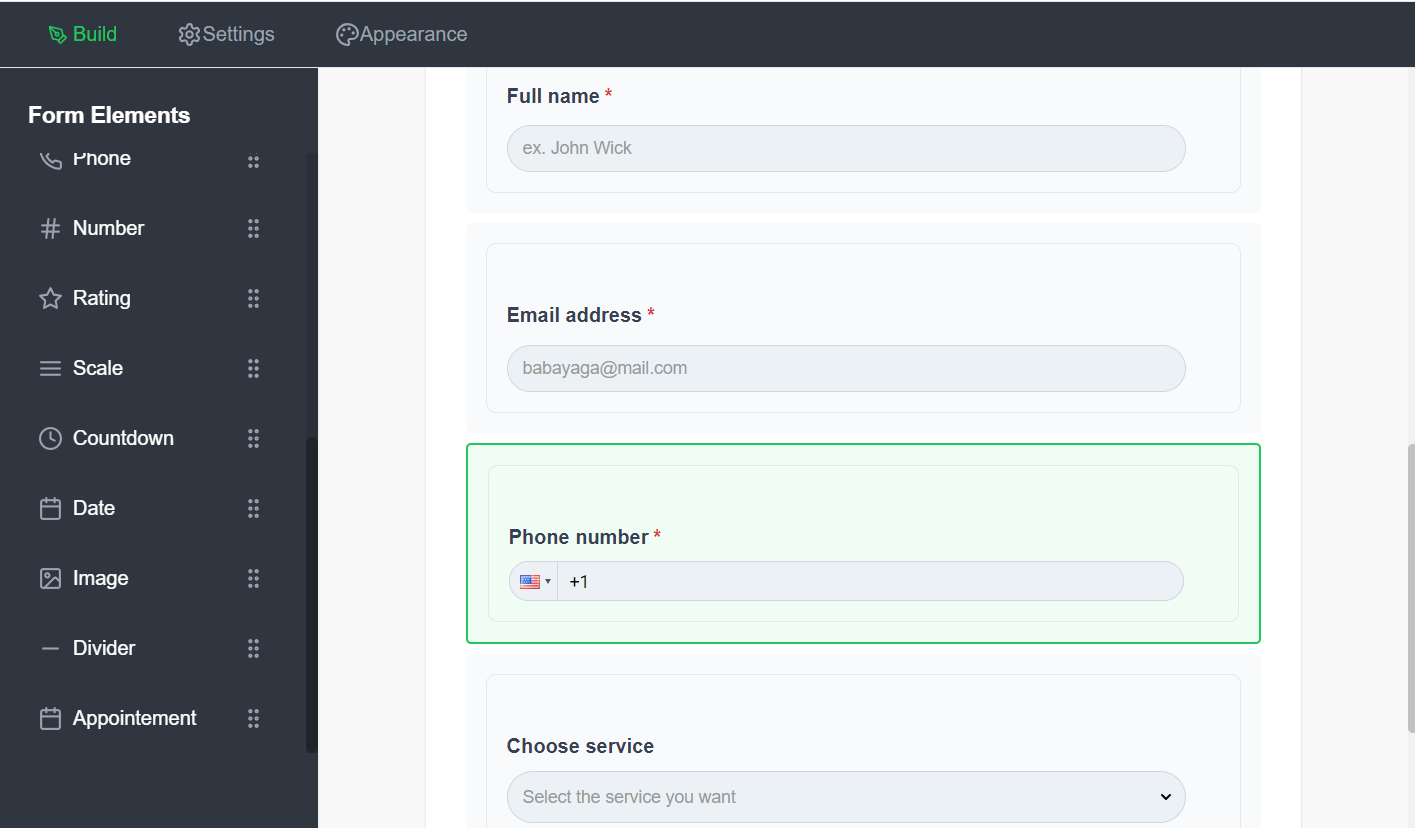
Now it’s time to set up the essential fields that clients will fill out to book an appointment. In the Clickiny form builder, you can drag and drop fields to customize your booking form:
- Client Name: Add a field for clients to enter their name, helping you personalize interactions.
- Phone Number: This field is crucial for confirming bookings and allows easy follow-up if needed.
- Email Address: Include an email field if you want an additional way to reach clients or send appointment confirmations.
- Service Type: Use a dropdown or checklist for clients to select services like “Haircut,” “Color,” or “Styling.” This helps you prepare for their appointment and estimate timing.
Step 6: Preview the Form
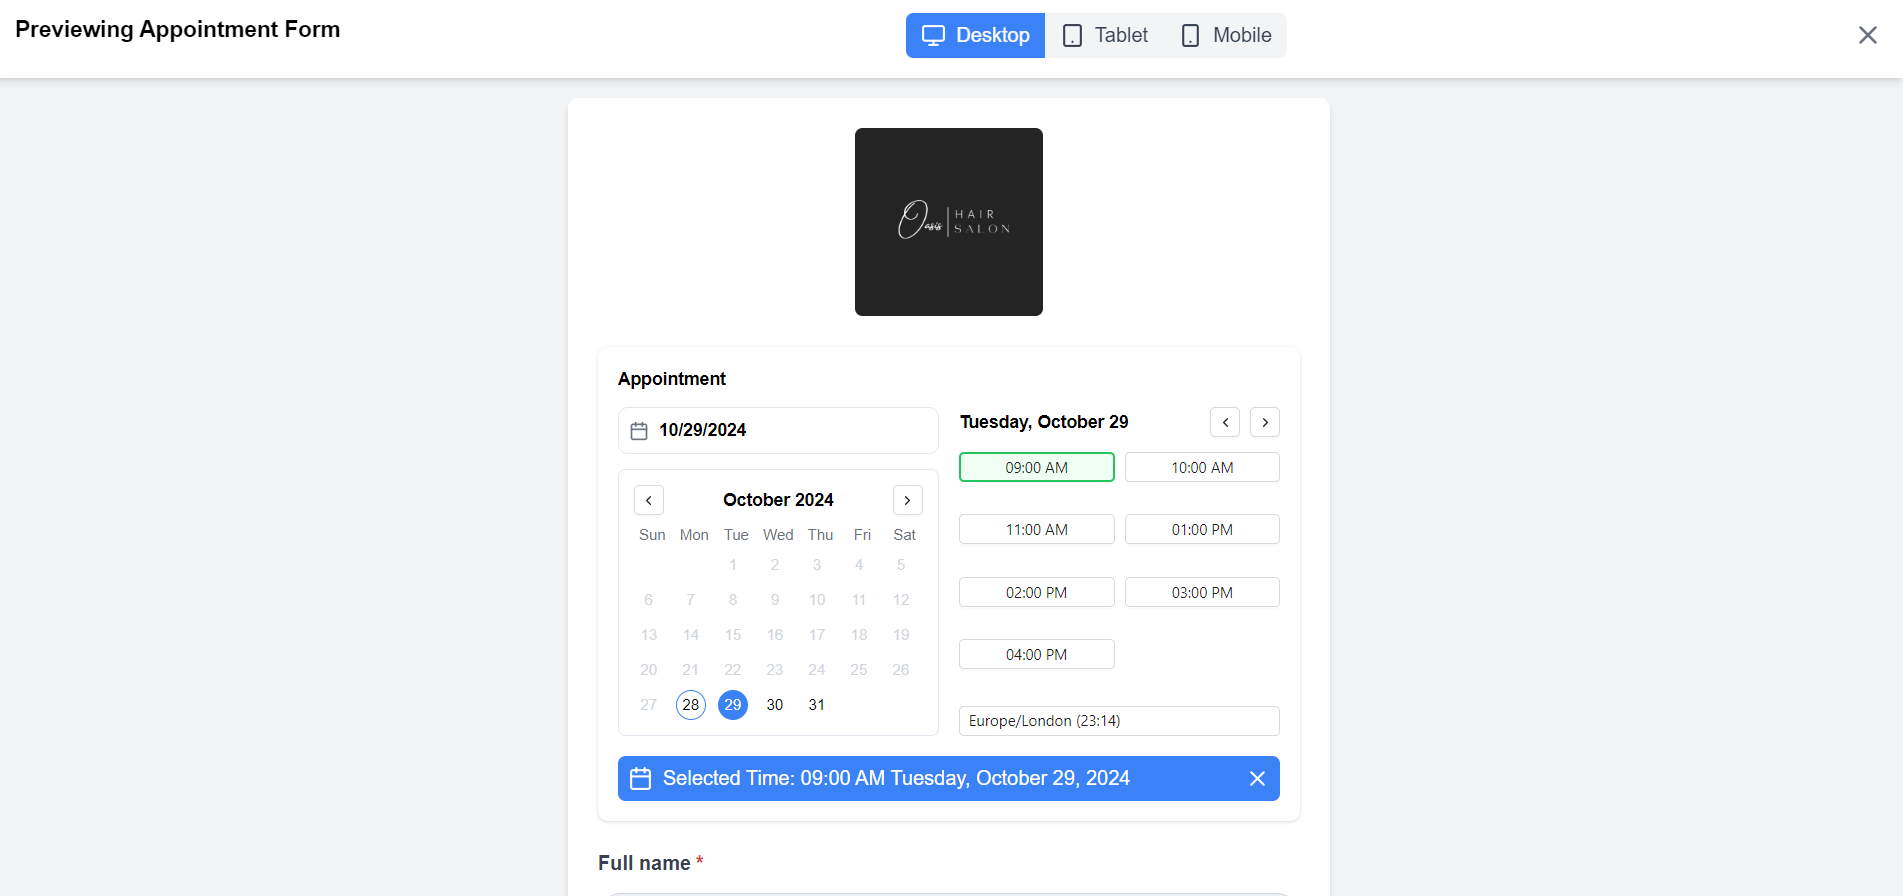
After setting up your appointment form, it’s crucial to preview it to ensure everything functions as intended. Here’s how to do it:
- Access the Preview: Click the Preview button at the header of the form builder. This will open a view of how the form will appear to clients.
- Test Functionality: Go through the form as if you were a client. Fill in fields, select appointment times, and ensure all options work correctly.
- Check Layout and Clarity: Review the overall layout for organization and clarity. Ensure that all fields are visible and clearly labeled.
- Make Adjustments: If you notice any issues or areas for improvement, return to the builder to make necessary adjustments.
Taking the time to preview and test your form ensures a smooth booking experience for your clients.
Step 7: Click Save
Once you’re satisfied with the WhatsApp appointment booking form layout and fields, click the “Save” button. This saves your form and prepares it for publication.
Step 8: Publish and Share Options
Once you’re satisfied with your appointment form and have completed the preview, it’s time to publish it and make it accessible to your clients. Here’s how to do that effectively:
Click the Publish Button:
Locate and click the Publish button within the form builder. This action will make your form live, allowing clients to start booking appointments.
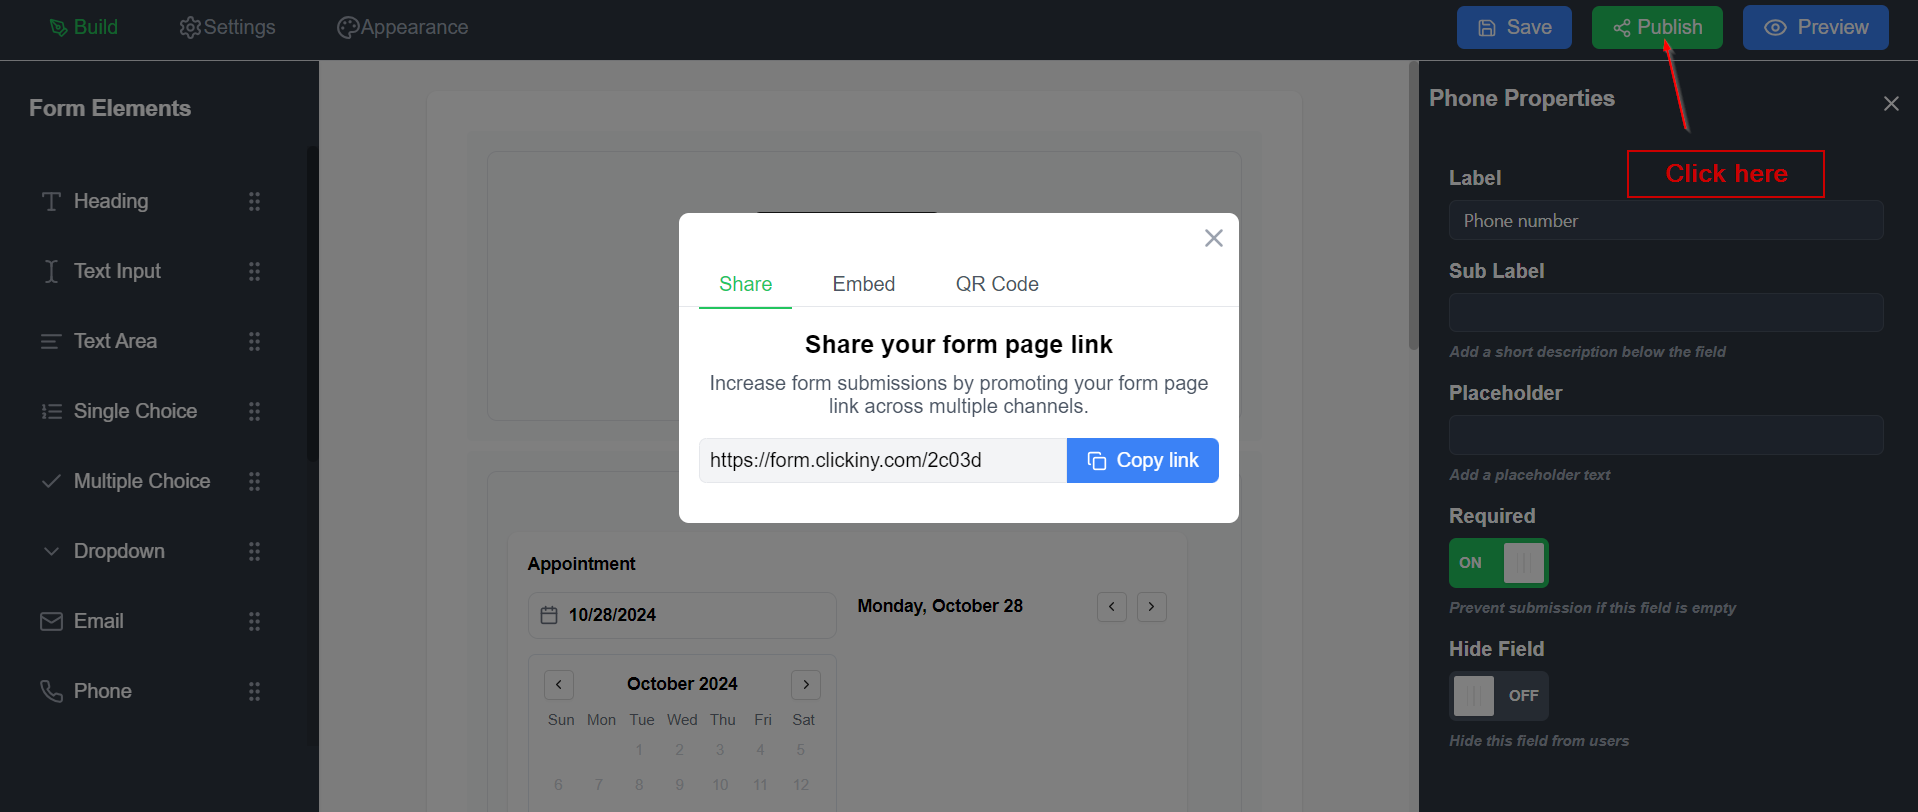
Select Sharing Options:
After publishing, you’ll be presented with various sharing options to distribute your form effectively:
- Embed on Your Website: If your hair salon has a website, select the option to get the embed code. This code allows you to place the form directly on your site, making it easy for visitors to schedule appointments without leaving the page.
- Generate a Direct Link: A direct link will automatically be created for you. This link can be shared through email, social media, or messaging platforms, providing a convenient way for clients to book appointments.
- Create a QR Code: For in-person promotions, you can generate a QR code that clients can scan with their smartphones. This is particularly useful for placing in-store signage, flyers, or business cards, enabling clients to access the booking form instantly.
Promote Your Form:
Once you have the embed code, link, or QR code, promote your booking form across your salon’s channels:
- Social Media: Share the link or QR code on your salon’s social media profiles to reach a broader audience.
- Email Newsletters: Include the link in newsletters or promotional emails to keep your clients informed about how they can book appointments easily.
- In-Store Displays: Use printed materials with the QR code at your salon to encourage walk-in clients to book their next appointment on the spot.
Monitor Engagement:
After sharing, keep an eye on how clients are interacting with the form. Use Clickiny’s analytics (if available) to track submissions and see which sharing methods are most effective.
By publishing your form and utilizing various sharing options, you ensure that clients can easily access and use the booking system, ultimately enhancing their experience and increasing appointment bookings for your salon.
Best Practices for WhatsApp Appointment Booking
Implementing WhatsApp for appointment booking can streamline your salon’s operations and enhance client satisfaction. Here are some best practices to ensure a smooth and effective booking experience:
- Keep Communication Clear and Professional: Maintain a friendly yet professional tone in all your communications. Clear instructions on how to book, cancel, or reschedule appointments can help minimize confusion and enhance client trust.
- Be Responsive: Respond promptly to appointment requests and client inquiries via WhatsApp. Quick replies show clients that you value their time and are committed to providing excellent service. Aim to reply within a few hours, if not sooner.
- Utilize Automated Responses: Set up automated replies for common queries, such as business hours or booking confirmations. This can help manage client expectations and provide immediate assistance, especially during busy times.
- Regularly Update Availability: Keep your appointment slots updated in the Clickiny form to reflect any changes in your schedule, including holidays, staff availability, or special events. This ensures clients can only book during your available times, reducing scheduling conflicts.
- Confirm Appointments: Always confirm appointments with clients via WhatsApp. A simple message confirming the date and time of their appointment helps to prevent no-shows and reassures clients of their booking.
- Send Reminders: Consider sending reminder messages 24-48 hours before an appointment. This reminder can help reduce cancellations and ensure clients remember their scheduled time.
- Encourage Feedback: After each appointment, follow up with clients to gather feedback about their experience. This not only shows that you care about their opinion but also provides valuable insights for improving your services.
- Maintain a Personal Touch: Personalize interactions by addressing clients by name and remembering details from previous visits. This builds rapport and enhances the client experience, making them more likely to return.
- Monitor Appointment Trends: Use Clickiny’s analytics to track appointment trends and popular services. Understanding client preferences can help you tailor your offerings and optimize scheduling for peak times.
- Educate Clients on Using the Booking Form: Provide clear guidance on how to fill out the WhatsApp booking form, including selecting services and available time slots. Consider creating a short video tutorial or a FAQ section to assist clients in navigating the booking process.
By following these best practices, you can create a seamless and efficient WhatsApp appointment booking experience that not only satisfies your clients but also streamlines your salon’s operations. This proactive approach fosters strong client relationships and contributes to long-term business success.
Frequently Asked Questions
Can I customize the appointment form for different services?
Yes! Clickiny’s form builder lets you add and customize fields to suit various services. You can include options for different services, appointment durations, and even add a dropdown for clients to select specific stylists or team members.
What happens if I need to change or cancel an appointment?
You can view all appointments from your Clickiny dashboard. If a change is needed, communicate directly with the client on WhatsApp to confirm the update. Simply adjust the booking in your system and let the client know.
Can clients book outside my working hours?
No, Clickiny’s appointment form settings allow you to specify available days, times, and even breaks (e.g., lunch hours). This ensures clients can only book within your set business hours.
How do I share the booking form with my clients?
After publishing the form, Clickiny provides a direct link that you can easily share via social media, email newsletters, or even in-store flyers. Additionally, you can embed the form on your website or generate a QR code for easy scanning.
Can I send reminders to clients about their appointments?
While Clickiny doesn’t send automatic reminders, you can easily send a quick message on WhatsApp 24-48 hours before the appointment. Many businesses find this personal approach reduces no-shows.
Is Clickiny’s appointment form secure?
Yes, Clickiny uses secure protocols to protect client data. Submitted information is only accessible to you through your Clickiny account and WhatsApp, ensuring privacy for both you and your clients.
